Introduction
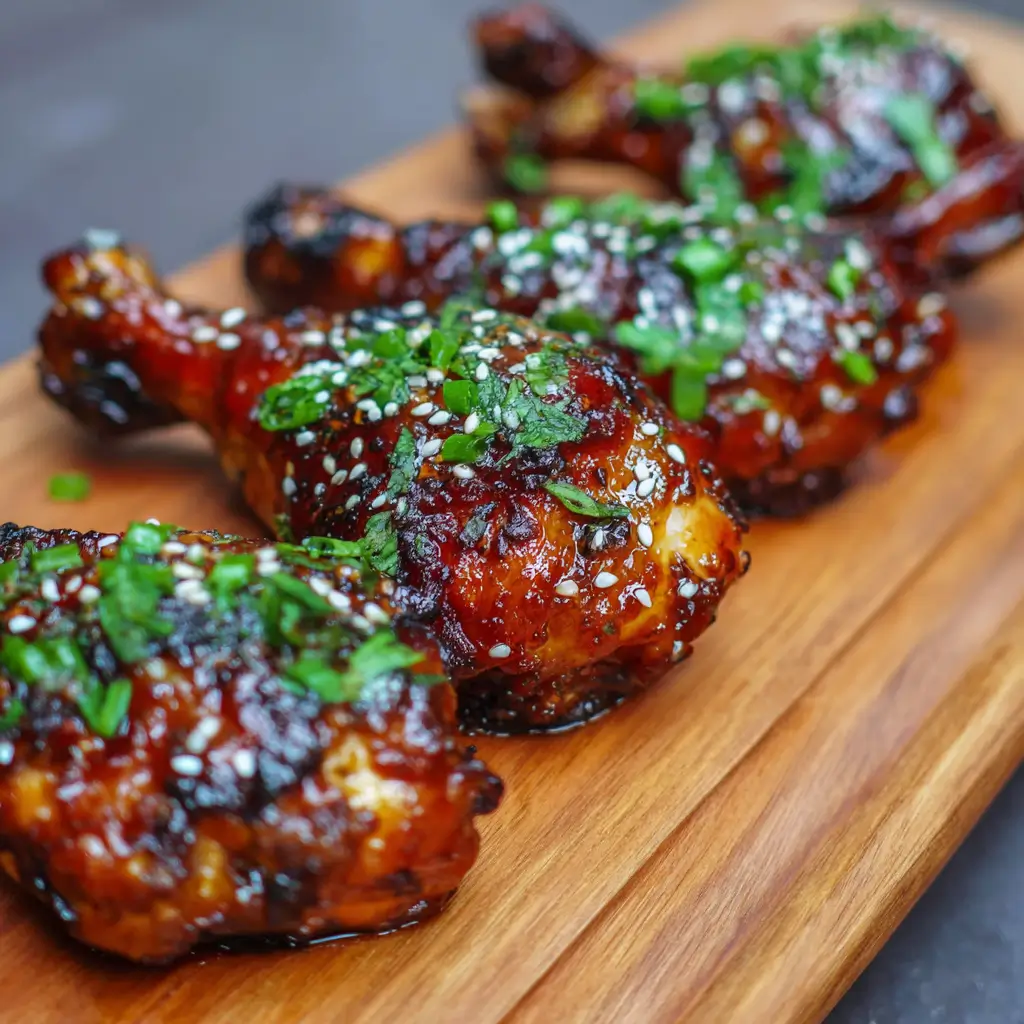
Teriyaki Glazed Chicken Drumsticks are a mouthwatering fusion of sweet, savory, and umami flavors that bring the essence of Japanese cuisine into your home kitchen. These succulent drumsticks are coated in a glossy, caramelized teriyaki glaze that clings perfectly to the tender meat, making them an irresistible centerpiece for any meal—whether it’s a weeknight dinner, backyard barbecue, or special occasion gathering. Loved by both kids and adults alike, this dish is as visually appealing as it is delicious, with its deep amber hue and glistening finish.
What makes Teriyaki Glazed Chicken Drumsticks so popular is their perfect balance of simplicity and bold flavor. With minimal prep time and ingredients you likely already have in your pantry, you can create a restaurant-quality dish that tastes like it came from a high-end izakaya (Japanese pub). The beauty of this recipe lies in its versatility—you can prepare it on the stovetop, in the oven, or even on the grill, adapting to your cooking preferences and lifestyle.
Chicken drumsticks are an ideal cut for this preparation because they remain juicy and flavorful even after prolonged cooking. Unlike leaner cuts such as chicken breast, drumsticks contain more connective tissue and fat, which break down during cooking to yield a moist, tender texture. When paired with the rich teriyaki sauce, these drumsticks become a comfort food favorite that satisfies cravings for something hearty yet elegant.
Whether you’re new to Asian-inspired cooking or a seasoned home chef looking to expand your repertoire, this guide will walk you through every step of crafting the perfect Teriyaki Glazed Chicken Drumsticks—from understanding the history behind teriyaki, breaking down each ingredient, mastering the cooking techniques, and exploring creative variations to suit dietary needs and personal taste. Get ready to embark on a culinary journey that transforms humble drumsticks into a show-stopping dish everyone will love.
The History
The origins of teriyaki trace back centuries to traditional Japanese cooking methods, where “teri” means luster or shine, and “yaki” refers to grilling or broiling. Together, teriyaki describes the glossy sheen that results when foods are cooked with a sugar- or honey-based glaze under heat. This technique was first documented in Japanese cookbooks during the Edo period (1603–1868), where fish—especially salmon and mackerel—were commonly prepared using soy sauce, mirin, and sake to enhance flavor and preservation.
Originally, teriyaki wasn’t a sauce but a method of cooking. Fish would be marinated briefly, then grilled or broiled over charcoal, basting continuously with a mixture that created a beautiful lacquered finish. The natural sugars in the marinade caramelized on the surface, forming a thin, shiny crust while locking in moisture. This method emphasized simplicity, balance, and respect for the ingredient’s natural flavor—a hallmark of Japanese culinary philosophy.
As Japan opened up to global influences in the late 19th and early 20th centuries, teriyaki began evolving. With the advent of refrigeration and international trade, ingredients became more accessible, and home cooks started experimenting beyond fish. Chicken, beef, and pork were gradually incorporated into the teriyaki tradition, especially in post-war Japan and among Japanese communities abroad.
In North America, teriyaki gained widespread popularity in the mid-20th century, particularly in Hawaii and along the West Coast of the United States. Hawaiian-Japanese immigrants adapted the traditional recipe by adding pineapple juice, brown sugar, and garlic, creating a sweeter, more robust version suited to local palates. This Americanized teriyaki became a staple in diners, supermarkets, and home kitchens across the continent.
Today, teriyaki is one of the most recognized Japanese-inspired dishes worldwide, though it often differs significantly from its traditional roots. Store-bought teriyaki sauces, mass-produced for convenience, tend to be thicker, sweeter, and higher in sodium than authentic versions. However, making your own teriyaki sauce at home allows you to recapture the delicate balance of salty, sweet, and tangy notes that define the true spirit of this classic preparation.
The adaptation of teriyaki to chicken drumsticks is a relatively modern innovation, reflecting changing dietary trends and the global love for finger foods. Drumsticks offer a fun, handheld experience similar to wings, making them ideal for family meals, parties, and casual dining. By applying the time-honored teriyaki technique to this affordable and flavorful cut, we honor culinary tradition while embracing contemporary tastes and cooking styles.
Ingredients Breakdown
The magic of Teriyaki Glazed Chicken Drumsticks lies not only in the cooking method but also in the careful selection and balance of ingredients. Each component plays a crucial role in building layers of flavor, texture, and aroma. Let’s explore each ingredient in detail to understand its purpose and how it contributes to the final dish:
- Chicken Drumsticks (bone-in, skin-on): The star of the dish. Bone-in drumsticks retain moisture better during cooking and provide richer flavor due to the marrow and connective tissues. The skin crisps beautifully when seared or roasted, offering a satisfying contrast to the tender meat underneath. Opt for organic or free-range chicken if possible for improved taste and ethical sourcing.
- Soy Sauce: The backbone of the teriyaki sauce, providing saltiness and umami depth. Use naturally brewed soy sauce rather than chemically produced versions for superior flavor. For a lighter color and milder taste, light soy sauce works well; dark soy sauce adds richness and deeper color. Gluten-free tamari is an excellent substitute for those avoiding gluten.
- Low-Sodium Soy Sauce: Used in combination with regular soy sauce to control overall salt content without sacrificing flavor. This dual approach gives you greater control over seasoning, especially important since store-bought sauces can vary widely in sodium levels.
- Brown Sugar: Adds sweetness and helps create the signature glossy glaze. Its molasses content contributes a subtle caramel note that enhances complexity. You can substitute with coconut sugar, maple syrup, or honey for different flavor profiles or dietary needs.
- Honey: Complements the brown sugar by adding floral sweetness and aiding in caramelization. It also acts as a natural thickener and gives the glaze a smooth, sticky consistency. Avoid ultra-processed honey; raw or local varieties offer better flavor.
- Fresh Ginger (minced or grated): Imparts a warm, spicy zing that cuts through the richness of the sauce. Fresh ginger contains volatile oils that dried ginger lacks, delivering bright, aromatic notes essential to authentic teriyaki. Always use fresh for best results.
- Garlic (minced): Provides pungent depth and savory undertones. Garlic mellows during cooking, blending seamlessly into the sauce while enhancing overall umami. Use freshly minced cloves rather than pre-minced jarred garlic for optimal freshness and potency.
- Rice Vinegar: Balances sweetness with mild acidity, preventing the sauce from being cloying. Unseasoned rice vinegar is preferred to avoid added sugars or salts. Apple cider vinegar can be substituted in a pinch, though it will slightly alter the flavor profile.
- Shaoxing Wine or Dry Sherry: Adds complexity and depth, helping deglaze the pan and carry flavors. Shaoxing wine is a Chinese rice wine commonly used in Asian cuisine; dry sherry is a Western alternative with similar nutty characteristics. If unavailable, mirin (sweet rice wine) can be used, though it increases sweetness.
- Mirin: A sweet rice wine integral to traditional teriyaki. It contributes both sugar and alcohol, which burn off during cooking, leaving behind a subtle sweetness and shine. Authentic mirin has a balanced flavor; “aji-mirin” (mirin-style condiment) contains additives and less alcohol, so use sparingly.
- Sesame Oil: Used in small amounts for finishing, this oil adds a nutty fragrance and elevates the aroma of the finished dish. Toasted sesame oil is strongly flavored, so a little goes a long way. Never use it for high-heat cooking, as it burns easily.
- Cornstarch Slurry (cornstarch + water): Helps thicken the sauce to achieve a velvety, clingy texture that adheres perfectly to the chicken. This ensures the glaze coats each drumstick evenly without running off. Arrowroot powder can be used as a grain-free alternative.
- Green Onions (sliced): Used as a garnish, green onions add freshness, color, and a mild onion bite. Both white and green parts are usable—whites can be sautéed into the sauce, greens sprinkled on top before serving.
- Sesame Seeds (toasted): Optional but recommended for added crunch and visual appeal. Toasting intensifies their nuttiness and complements the glossy finish of the glaze.
Step-by-Step Recipe
Follow this detailed guide to make perfectly glazed Teriyaki Chicken Drumsticks with a rich, sticky coating and juicy interior.
- Prepare the Chicken: Pat the chicken drumsticks dry with paper towels. This step is crucial for achieving crispy skin and proper browning. Season lightly with salt and pepper on all sides.
- Make the Teriyaki Sauce: In a medium saucepan, combine ½ cup low-sodium soy sauce, ¼ cup water, ¼ cup brown sugar, 3 tablespoons honey, 2 tablespoons rice vinegar, 2 tablespoons mirin, 1 tablespoon Shaoxing wine or dry sherry, 1 tablespoon finely grated fresh ginger, and 3 cloves minced garlic. Whisk together over medium heat until the sugar dissolves.
- Simmer the Sauce: Bring the mixture to a gentle simmer and cook for 5 minutes to allow the flavors to meld. Remove about ¼ cup of the sauce and set aside for basting later. This reserved portion should not touch raw chicken to prevent cross-contamination.
- Thicken the Sauce: In a small bowl, mix 1 tablespoon cornstarch with 2 tablespoons cold water to form a slurry. Slowly whisk the slurry into the simmering sauce. Continue cooking for another 2–3 minutes until the sauce thickens to a syrupy consistency. Remove from heat and stir in 1 teaspoon toasted sesame oil. Set aside.
- Preheat Oven: Preheat your oven to 375°F (190°C). Line a baking sheet with aluminum foil and place a wire rack on top for even air circulation and crispier skin.
- Sear the Drumsticks (Optional but Recommended): Heat 1 tablespoon of neutral oil (like vegetable or canola) in an oven-safe skillet over medium-high heat. Sear the drumsticks skin-side down for 4–5 minutes until golden brown. Flip and sear the other side for 2 minutes. This step enhances flavor and texture.
- Transfer to Oven: Place the seared drumsticks on the prepared wire rack. If not searing, simply arrange raw drumsticks on the rack and brush lightly with oil to promote browning.
- Bake: Roast in the preheated oven for 30 minutes. After 30 minutes, flip the drumsticks and continue roasting for another 15–20 minutes, or until the internal temperature reaches 165°F (74°C) when measured with a meat thermometer inserted near the bone.
- Glaze the Drumsticks: During the last 10 minutes of cooking, brush the reserved teriyaki sauce generously over the drumsticks. Flip and repeat on the other side. Repeat once more halfway through to build up a thick, glossy layer.
- Broil for Shine (Optional): For extra caramelization, switch the oven to broil for the final 2–3 minutes. Watch closely to prevent burning. The glaze should bubble and darken slightly, giving a professional-looking finish.
- Rest and Serve: Remove from the oven and let the drumsticks rest for 5 minutes. This allows juices to redistribute, ensuring maximum tenderness. Drizzle with additional warm teriyaki sauce, sprinkle with sliced green onions and toasted sesame seeds, and serve immediately.
Tips
- Dry the Chicken Thoroughly: Moisture is the enemy of browning. Patting the drumsticks dry ensures a better sear and crisper skin.
- Don’t Skip the Searing Step: While optional, searing locks in flavor and creates a Maillard reaction, adding complexity to the final taste.
- Use a Meat Thermometer: To avoid undercooking or drying out the meat, always check internal temperature. 165°F (74°C) is safe for poultry.
- Reserve Sauce Before Adding Raw Chicken: Never reuse sauce that has touched raw meat. Always set aside a portion before marinating or basting.
- Thicker Glaze = Better Adhesion: Simmer the sauce long enough and use cornstarch properly to ensure it clings well to the chicken.
- Let the Sauce Bubble During Broiling: The bubbling action concentrates flavors and enhances the glossy appearance.
- Marinate for Extra Flavor (Optional): For deeper flavor, marinate drumsticks in half the sauce (before boiling) for 2–4 hours or overnight in the refrigerator.
- Avoid Overcrowding: Whether baking or grilling, leave space between drumsticks for even cooking and browning.
- Double the Batch: Teriyaki sauce freezes well. Make extra and store in airtight containers for future use.
- Serve Immediately: Glazed chicken is best served hot. If reheating, do so gently to preserve the glaze integrity.
Variations and Customizations
One of the greatest strengths of Teriyaki Glazed Chicken Drumsticks is their adaptability. Here are several ways to customize the recipe based on dietary preferences, flavor interests, and cooking methods:
- Grilled Version: Preheat your grill to medium-high. Sear drumsticks over direct heat, then move to indirect heat to finish cooking. Baste with teriyaki sauce during the last 10 minutes. Adds smoky depth and charred edges.
- Slow Cooker Method: Brown drumsticks first, then place in a slow cooker with half the teriyaki sauce. Cook on low for 6 hours or high for 3–4 hours. Finish by broiling or grilling to crisp the skin and glaze.
- Stovetop-Only: After searing, reduce heat, cover, and simmer drumsticks in a shallow layer of teriyaki sauce for 30–40 minutes, turning occasionally, until fully cooked.
- Keto/Low-Carb: Replace sugar with erythritol or monk fruit sweetener, omit mirin, and use a sugar-free soy sauce alternative. Thicken with xanthan gum instead of cornstarch.
- Spicy Teriyaki: Add 1–2 teaspoons of sriracha, chili garlic paste, or red pepper flakes to the sauce for a fiery kick.
- Pineapple Teriyaki: Add ¼ cup pineapple juice to the sauce and garnish with grilled pineapple rings. Inspired by Hawaiian-style teriyaki.
- Ginger-Lime Twist: Add zest and juice of one lime to the sauce for a citrusy brightness that pairs wonderfully with ginger.
- Vegetarian Alternative: Use large portobello mushroom caps or tofu steaks with the same glaze for a plant-based version.
- Orange Teriyaki: Substitute orange juice for some of the water and add orange zest for a citrus-infused variation.
- Bourbon Teriyaki: Replace sherry with bourbon for a deeper, smoky-sweet profile that works beautifully on grilled drumsticks.
- Child-Friendly: Reduce garlic and ginger slightly, increase honey a bit, and serve with steamed rice and veggies for a balanced meal kids love.
- Sugar-Free Option: Use stevia or allulose as a sweetener and skip honey. Combine with a splash of apple cider vinegar to mimic sweetness perception.
Health Considerations and Nutritional Value
While Teriyaki Glazed Chicken Drumsticks are undeniably delicious, it’s important to consider their nutritional content and make mindful choices where needed. Here’s a breakdown of key health aspects:
Nutritional Highlights:
Per serving (1 medium drumstick with 2 tbsp glaze):
• Calories: ~280–320
• Protein: ~25g (excellent source)
• Fat: ~14g (mostly unsaturated and from skin)
• Carbohydrates: ~18–22g (primarily from sugar in glaze)
• Sodium: ~700–900mg (varies based on soy sauce used)
Benefits:
– High-quality protein supports muscle repair and satiety.
– Chicken provides essential nutrients like niacin, selenium, phosphorus, and B6.
– Ginger and garlic offer anti-inflammatory and immune-boosting properties.
– Using skin-on drumsticks provides healthy fats and prevents dryness.
Considerations:
– The glaze can be high in sugar and sodium, so moderation is key, especially for those managing diabetes, hypertension, or heart conditions.
– Excessive consumption of processed soy sauce may contribute to high sodium intake.
– Grilling at high temperatures can produce harmful compounds like HCAs; marinating and avoiding charring can reduce risk.
Healthy Modifications:
– Use reduced-sodium soy sauce or coconut aminos.
– Reduce sugar by 25–50% and compensate with a touch of fruit juice or vanilla extract for sweetness perception.
– Skim excess fat after cooking by blotting with paper towels.
– Serve with fiber-rich sides like quinoa, brown rice, or stir-fried vegetables to balance the meal.
– Incorporate turmeric or black pepper into the rub for added antioxidants.
Ingredients
- 8 chicken drumsticks (skin-on, bone-in)
- ½ cup low-sodium soy sauce
- ¼ cup regular soy sauce
- ¼ cup brown sugar (or coconut sugar)
- 3 tablespoons honey (or maple syrup)
- 2 tablespoons rice vinegar (unseasoned)
- 2 tablespoons mirin (sweet rice wine)
- 1 tablespoon Shaoxing wine or dry sherry
- 1 tablespoon fresh ginger, finely grated
- 3 cloves garlic, minced
- 1 teaspoon toasted sesame oil
- 1 tablespoon cornstarch
- 2 tablespoons cold water
- 1 tablespoon neutral oil (for searing)
- 2 green onions, sliced
- 1 teaspoon sesame seeds, toasted
- Salt and pepper to taste
Directions
- Pat chicken drumsticks dry and season with salt and pepper.
- In a saucepan, combine soy sauces, brown sugar, honey, rice vinegar, mirin, Shaoxing wine, ginger, and garlic. Whisk and bring to a simmer over medium heat.
- Simmer for 5 minutes. Remove ¼ cup sauce and reserve for basting.
- Mix cornstarch with water to make a slurry. Whisk into the sauce and cook 2–3 minutes until thickened.
- Remove from heat. Stir in sesame oil. Set aside.
- Preheat oven to 375°F (190°C). Line a baking sheet with foil and place a wire rack on top.
- Heat oil in an oven-safe skillet. Sear drumsticks skin-side down for 4–5 minutes until golden. Flip and sear 2 minutes more.
- Transfer drumsticks to the wire rack. Bake for 30 minutes.
- Flip drumsticks, bake 15 minutes more.
- Brush with reserved sauce, flip, and repeat. Continue baking 10 minutes.
- Optional: Broil 2–3 minutes for extra caramelization.
- Rest 5 minutes. Garnish with green onions and sesame seeds. Serve with extra warm sauce.
FAQ
Can I use chicken thighs instead of drumsticks?
Yes! Bone-in, skin-on chicken thighs work beautifully and cook in about the same time. Adjust based on size.
Can I make this ahead of time?
Absolutely. Cook and glaze the drumsticks, then reheat in a 350°F oven for 15 minutes. Add fresh glaze before serving.
Is teriyaki gluten-free?
Traditional soy sauce contains wheat. Use tamari or a certified gluten-free soy sauce to make it gluten-free.
How long do leftovers last?
Store in an airtight container in the fridge for up to 4 days. Reheat gently to preserve texture.
Can I freeze teriyaki chicken drumsticks?
Yes. Freeze cooked drumsticks without garnish for up to 3 months. Thaw overnight and reheat in oven.
Why is my sauce too thin?
Ensure you’re using a cornstarch slurry and simmering long enough. Double the slurry if needed.
Can I use bottled teriyaki sauce?
Yes, but homemade tastes fresher and lets you control sugar and sodium. Use 1 cup bottled sauce if substituting.
Are these kid-friendly?
Very! Kids love the sweet glaze. Serve with rice and steamed carrots for a complete meal.
Can I air fry these?
Yes. Air fry at 375°F for 25–30 minutes, flipping halfway. Glaze in the last 5 minutes.
What sides go well with teriyaki drumsticks?
Steamed jasmine rice, stir-fried vegetables, edamame, cucumber salad, kimchi, or miso soup.
Summary
Teriyaki Glazed Chicken Drumsticks combine succulent, juicy meat with a sweet-savory homemade glaze for a globally inspired dish that’s easy to prepare and universally loved. Perfect for weeknights, gatherings, or meal prep, this recipe delivers bold flavor, beautiful presentation, and endless customization options.